Tuesday, January 22, 2013

Experiment 12: Bruschetta Bagels

Figure 1.  Can you say delicious?
Introduction
Tonight for dinner, we decided to go through the refrigerator, combine some stuff, and come up with our own, original recipe.  At first, we wanted to make garlic bread on bagels.  Then we decided to add some cheese.  Our third addition was tomatoes, because there were about five left over from...ohh...you'll see.  Then we remembered that we don't really like tomatoes.  Well, we like them better when they're cooked.  Throw in some spices and spoonfuls of minced garlic, sauté it, and life is good!

Figure 2. Our NFPA Rating for Bruschetta Bagels
Our NFPA ranking:

Preparation Time: 40 minutes.  This recipe came together as we cooked; therefore, the prep didn't seem too time consuming.  40 minutes will do it.

Difficulty: 3.  As we said, this recipe came together as we cooked.  That means it can't be that hard, right?

Course: The herbs and spices say dinner, but this would also make a luxury lunchtime meal.


        Figure 3. Buttered Bagels

     Figure 4. Chopped Tomatoes
Materials
Bagels
1) Bagels - 2
2) Butter - (See below)
3) Pepper - less than a dash*
4) Sea Salt - less than a dash*
5) Mozzarella Cheese - 1.5 sticks of string cheese

*Amount per piece
 
Bruschetta
5) Tomato - half
6) Minced Garlic in Pure Olive Oil- 2 spoonfuls
7) Onion Powder - a dash
8) Italian Seasoning - a dash
9) Sea Salt - a dash
10) Pepper - a dash

Methods
1) Slice the bagels, cut them in half again, and spread butter over each (Fig. 1).  Add some sea salt and pepper.
2) Dice the tomato and sauté it with pepper, sea salt, Italian seasoning, and onion powder.
3) Add two spoonfuls of the minced garlic.

When the mixture gets watery and the tomatoes look less solid, it's ready.

3) Spread a spoonful of the bruschetta mixture over each quartered bagel.
4) Place a few strings of string cheese to the top.
5) Bake at 350 ºF for 15 minutes.

Figure 5. Cooking the tomato mixture
Figure 6. Assemble the Bruschetta and Bagels 


Results
Tasty!  For just combining a bunch of stuff from the refrigerator, this turned out really well!  The flavor was nicely balanced between the tomatoes, garlic, pepper, and bagel.  Admittedly, the cheese never actually melted, which made the bruschetta a bit difficult to eat.  The string cheese we used might have been low fat (not sure), and that could have caused this problem.  After a quick Google search, it turns out that the fact that string cheese doesn't melt is common knowledge among amateur cooks.  So...we guess we missed that one. We recommend using a higher quality cheese that has all its fat to avoid this problem.  Regardless, the unmelted cheese did not affect the flavor.

Figure 7. Bruschetta Bagels
Discussion
Over the course of this blog, we've told you about taste, perception, and memory.  None of that would matter if external stimuli (e.g. the food) couldn't somehow be converted into a signal that our brains could understand.  For example, we told you a little about the taste transduction process with Pumpkin Cinnamon Rolls and Mexican Style Chicken, and scent transduction with Potato Latkes.  But the question still remains: once these chemical stimuli (e.g. taste and smell) are converted into electrical signals, how do these signals make it to the brain?

They travel down neurons.


To be honest, we picked this topic for discussion because we are Neurochefs, and we like neurons.  No, there were no neurons used as ingredients in this recipe, because that would be gross.  Still, neurons are cool, so we're gonna tell you a bit about them.  There are many different kinds of neurons, but we're going to tell you about a stereotypical, "general" neuron (Figure 8).

Neurons have a soma, or cell body, in the middle.  In one direction, branches of dendrites extend from the cell body.  Think of them like tree branches, but really tiny.  In the other direction, a long, thin axon extends.  Like in a wire, information is sent down a neuron with an electrical signal.  These electrical signals usually travel from dendrite to axon.  Signals enter a neuron in its dendrites, and it travels through the soma and down the axon to the end, where it travels on to other neurons.
Figure 8. A typical neuron.  Signals enter the cell through the dendrites, travel through the soma, and down the axon to the axon terminal, where the cell communicates with the dendrites of another cell.
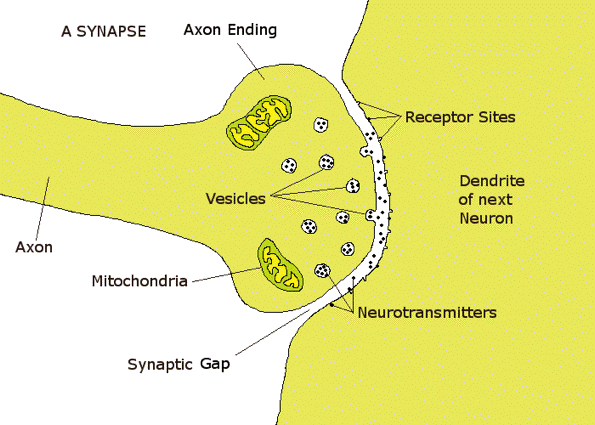
Figure 9.  When an electrical signal reaches the end of an axon, it causes the
release of neurotransmitters, which bind to the next neuron and initiate a new
electrical signal.
Neurons communicate with each other either through chemical or electrical synapses, but chemical synapses are more common, so we are going to focus on those.  A chemical synapse is the 30 nm (30 billionths of a meter) space between the axon of one neuron and the dendrite of another, across which different chemical messengers carry signals.  When an electrical signal reaches the end of the first neuron's axon, it causes these chemical messengers, called neurotransmitters, to be released, and these bind to receptors on the dendrites of other neurons, which in turn induce an electrical signal that propagates down the next cell.

Your neurons don't travel in a series of single-lane roads.  They often bundle together in parallel to form nerves.  Taste is carried to the brain by the trigeminal nerve and odor is carried by the olfactory nerve.  What happens once these signals reach the brain?  That's another story.

References: Recipe
None!  Original recipe!

References: Discussion
Our brains!

Tuesday, January 15, 2013

Experiment 11: Fried Rice

Figure 1.  Fried Rice.  Delish.
Introduction
What do you do when you have an extra four pounds of sushi rice sitting around?  Either you make way more sushi than you would want to eat, or you find another recipe that uses rice.  We chose to cook fried rice and created our own recipe.  After looking at some different fried rice recipes online and eating fried rice in a bunch of different restaurants, we figured out what we liked and didn't like to eat with rice, and chose what we wanted for our recipe (Fried Rice 2001, JingBat 2010).

This recipe was pretty painless to make.  Either it was a simple one, or we're getting better at cooking.  Just for fun, let's assume our neurochef skills are improving.  Here are our NFPA ratings for this recipe:
Figure 2. Our NFPA Ratings for fried rice.

Difficulty: This recipe gets a 2 because it wasn't that difficult.  Sure, you have to chop a few things, and mix a few things, but it's not that much work.  Furthermore, we had fewer vegetables to chop because we used pre-chopped, frozen carrots.  Don't judge, it saves time.

Preparation Time: 45 minutes.  We worked pretty efficiently on this recipe.  Of course, it helps to have four hands chopping and frying, but the entire production fit neatly into a 45-minute window.

Course: We ate our rice for dinner, but it could also make a great lunch.  Really, it's a fairly complete meal - chicken, rice, and vegetables.  For some people (mostly students), fried rice could even make a nice breakfast item.

Materials
Figure 3.  Vegetables: chopped, mixed, and cooking
1) Broccoli - around 8 pieces
2) Scallions - 4 stalks
3) Olive Oil - just pour some in the pans
4) Soy Sauce - 2.5 tablespoons
5) Frozen pea & carrot mix - 0.75 cups
6) Yellow Onion - half a chopped onion
7) Salt - just add some and guess
8) Rice vinegar (We forgot this one.)
9) Garlic - 3 cloves
10) Chicken - 2 breasts
11) Sushi Rice - 3 cups
12) Crushed Red Pepper - As much as you want

Procedure
Figure 4. CW from top right: rice, veggies, chicken, and pot
of unknown origin
1) Cook the sushi rice using the directions on the package.  Set aside.
2) Dice the chicken into .5 inch pieces.  In one frying pan, add some olive oil.  When the olive oil is warm, add the chicken to the frying pan and cook it.
3) Chop the broccoli, scallions, garlic cloves, and onion.  Heat some olive oil in a separate frying pan.  Add the peas, scallions, garlic, carrots, broccoli, and onions and cook them (Figure 3).
4) Add some salt and the crushed red pepper to both frying pans.
5) When everything is cooked, combine the chicken, vegetables, and rice into the largest frying pan and mix.  Add the soy sauce and continue mixing.  Best eaten hot.

Figure 5.  Everything mixed together.
Results
We were quite pleased with the very tasty results of this recipe (n=3), which was exciting because it was one of our first original recipes.  While eating, we compared our fried rice with restaurant fried rice.

At first, we thought the fried rice could have used a bit more seasoning, mainly salt.  Almost right away though, we realized that we were simply accustomed to eating salty fried rice at restaurants, and that our recipe was pretty delicious without all the extra salt.

We noted that in addition to being less salty than restaurant fried rice, our recipe was less greasy.  The only time we used oil was a small amount of olive oil in each frying pan.  When the oil looked like it was nearly used up, we added water (about one cup) to each frying pan.  Adding water prevented overcooking, kept everything moist, and reduced the amount of oil used.  Though many recipes used butter, we decided to leave it out since we weren't sure what it would add.

A third difference between our fried rice and restaurant fried rice is that we decided not to use eggs.  Rather than using some sort of egg substitute, like another thickening agent, we just left out the eggs.  It didn't seem to hurt the recipe at all.

Discussion

Why fresh vegetables taste better than frozen vegetables.

Fruits and vegetables are mostly water.  When these delicate plant products are put in the freezer, the water in their cells turns into ice crystals and expands, which causes the walls that define the structure of the cell to rupture.  Cell walls are unique to plants and some bacteria, and they serve several functions.  First, cell walls keeping the contents of the cell in place and control the transmission of molecules between areas.  Second, since cell walls are rigid, which keeps plants rigid, and therefore crunchy.  When a fruit or vegetable is frozen and its cell walls rupture, enzymes that normally break down cell waste migrate to places they are not supposed to be - remember, cell walls keep these sorts of things in place (Figure 6; America's Test Kitchen, 2012).  When said fruit or vegetable is thawed, these enzymes become active and wreak havoc wherever they have ended up.  As a result of the cell wall rupturing and enzymatic degradation, your fruits and vegetables turn into off-color, off-flavor, off-texture versions of their pre-frozen selves.
Figure 6. The effects of freezing and thawing tobacco leaves. A) Fresh tobacco
leaf cells. B) Frozen leaf cells, exhibiting extensive rupturing. C) Magnification of
B, showing collapse of cell wall (arrow).  D) Thawed leaf, showing complete
disruption of cell structure.  Borrowed from Pearce, 2001.

This seems like a problem, right?  It looks like nature's way of continuing to ensure that nothing comes easy.  Sometimes you don't have the patience to cut up vegetables when the pre-chopped frozen alternative is a few aisles down.  Or, you might not have the energy or time after a long day at work to refine your knife skills with endless chopping, slicing, and mincing.  So how do you solve this conundrum?

Fortunately, vegetable manufacturers have solved this problem for you!  When you buy frozen vegetables at the store, they come blanched (America's Test Kitchen, 2012).  Blanching is the process of dipping a frozen food into boiling water, and then removing it after a short time and putting it in cold water to stop the cooking process.  Blanching breaks down all of the enzymes that would otherwise destroy your foods from the inside out without cooking the food itself.  The vegetables therefore maintain their color and taste - this is why your peas, carrots, peppers, broccoli, and other vegetables are brightly colored when they come out of the bag.

Problem solved!

References
1) 2001. "Fried Rice." Television Food Network, G.P.
2) JingBat. April. 2010. "Meegol's Fried Rice." VegWeb.
3) America's Test Kitchen. 2012. The Science of Good Cooking. Brookline, MA: America's Test Kitchen. Print.
4) Pearce RS. 2001. Plant Freezing and Damage. Annals of Botany 87: 417-24.

Tuesday, January 8, 2013

Experiment 10: Cheesecake


Introduction
When the clock struck midnight on New Years Day, that marked the halfway point between our two birthdays.  What better way to spend the afternoon before that moment to make cheesecake?

We pulled the crust and cake recipes from two different sources.  The cake recipe does not include any eggs.  In its stead, we used cornstarch, which, if you read our article on thickening agents, you'll know can serve as a perfectly ample substitute.  The crust recipe (naturally egg-less) works with not only cheesecake, but any pie that suits your fancy.

Our NFPA Rankings:


Prep time: The bulk of your time will be spent waiting for your cake to bake. Mixing the ingredients and constructing the cake only take about 20 minutes total. 

Difficulty: This recipe is easy.  Crust?  Mix all of the ingredients together.  Cake?  Mix some of the ingredients together, bake it for a while, mix the rest in, and bake a little more.  It is really hard to make a mistake.

Course:  Cheesecake.  It's what's for dessert.


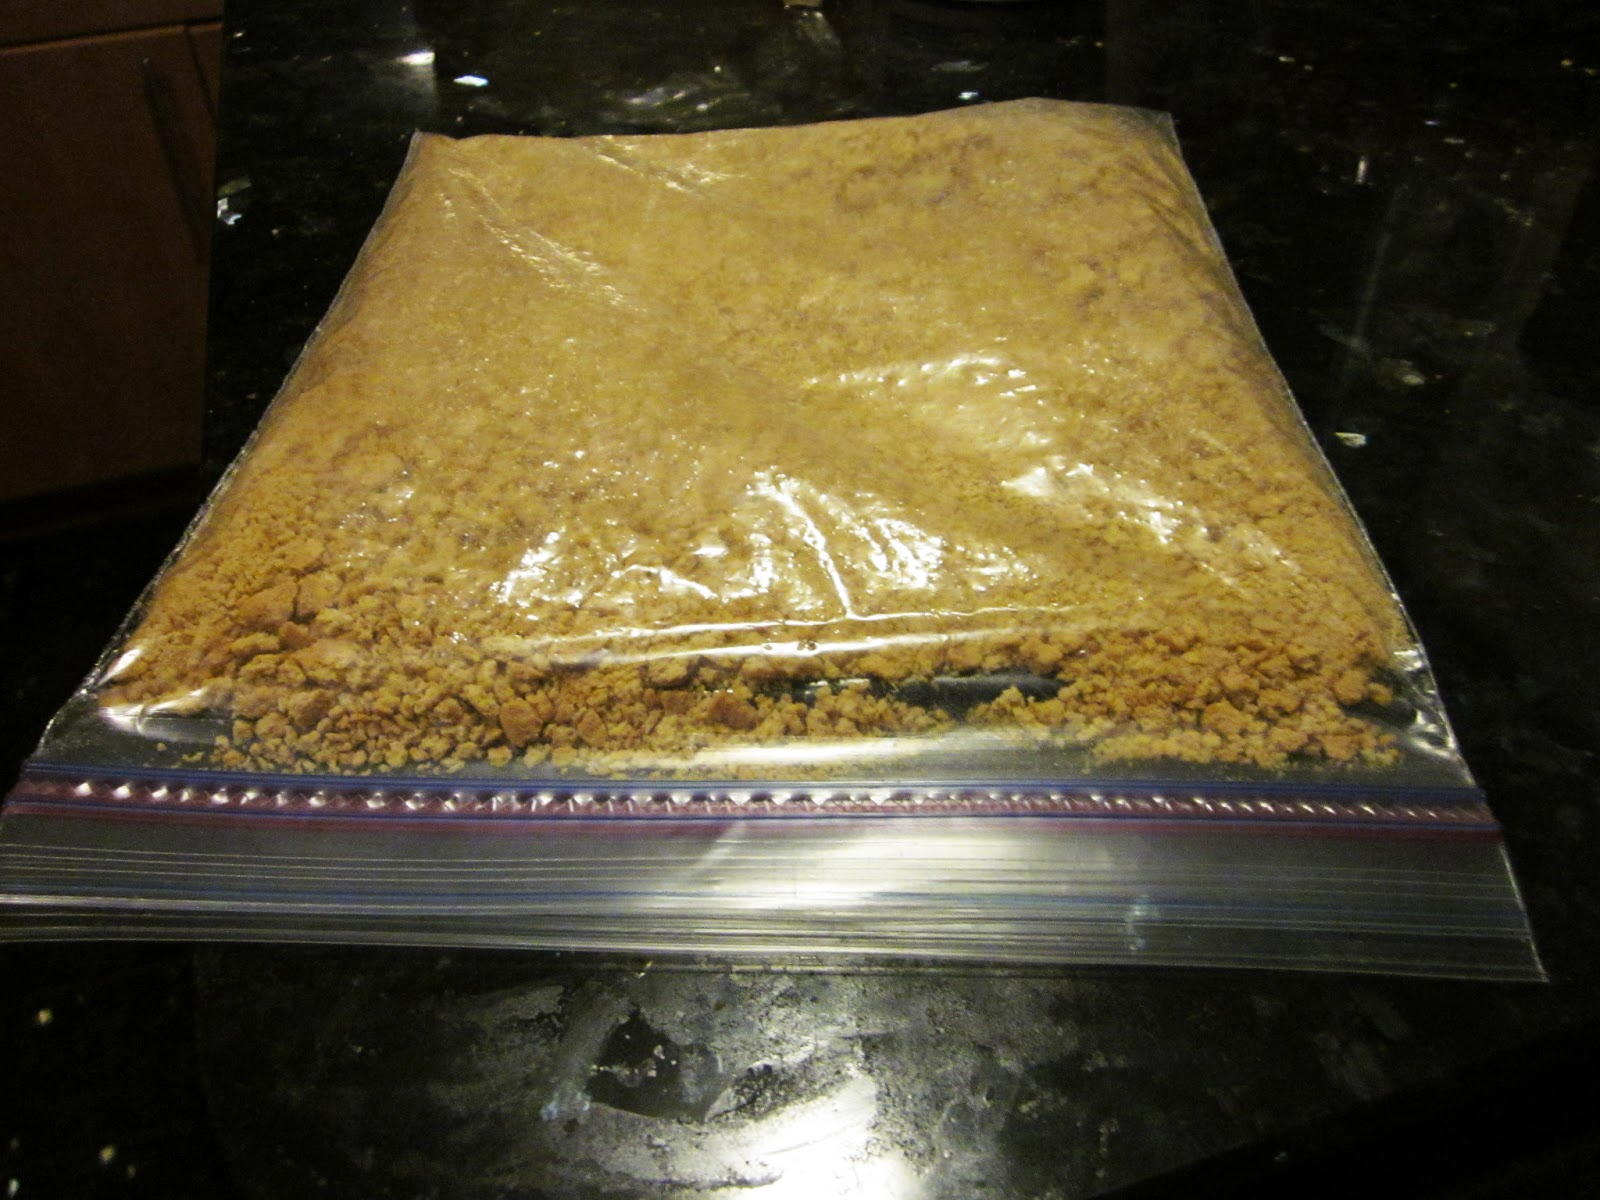
Figure 3. Stick your graham crackers in a zip-lock bag 
and crush.
Materials and Methods
Crust (Bottom Layer)
Cinnamon graham crackers (GC) - 1.5 cups (1 package of 9-10 GCs)
Sugar - 0.33 cups
Butter - 6 tbsp (melted)
Cinnamon - 0.5 tsp

1) Crush the graham crackers into very fine crumbs (Fig. 3)
2) Mix all of the ingredients together
3) Using the back of a spoon, press the crust into the bottom of a springform pan


Figure 4. Middle Layer of Cheesecake

Cake (Middle Layer)

Cream cheese - 8 oz
Sugar - 1 cup
Cornstarch - 1 tbsp
Vanilla - 1 tbsp 

1) Mix all of the ingredients together
2) Pour into the pan spread it evenly over the crust
3) Bake for 35 minutes at 350 ºF
4) Let it cool for 5 minutes after baking (IMPORTANT!!!)


Figure 5. Top Layer of Cheesecake
Cake (Top Layer)
Sour cream - 1 pt
Sugar - 0.5 cup
Vanilla - 1 tsp
Strawberries

1) Mix all of the ingredients together
2) Spread on top of the first layer
3) Bake for 10 minutes at 400 ºF
4) Chill in the refrigerator
5) Slice some strawberries and arrange them on top of the cake in an aesthetically pleasing pattern.


Results
How can we describe this cake?  To put it straight: this is the most amazing dessert we have ever made, and quite possibly one of the best desserts we have ever eaten.  The cake itself was sweet, but not overpowering, as the tartness of the sour cream balanced out the sweetness of the rest of the cake.  The graham cracker crust was moist and not grainy, sweet and not bitter.  We are definitely happy with our decision to purchase cinnamon graham crackers at the grocery store (as opposed to honey), as the sharp taste of cinnamon proved to be the perfect addition to our smooth, sweet cheesecake.

Figure 6. Our Completed Cheesecake
We also debated as to whether or not we needed to build the crust up on the sides of the pan, or if it should just cover the base.  We opted for the base-only crust, and....wow, was it a great choice.  The sugar on the edge of the cake caramelized when it baked, which serendipitously yielded a sweet, chewy, caramel crust that we could not have come up with on purpose if we tried.

To put it simply, it is not possible to describe how we felt when we consumed this confection.  If we were to try, we would only shame ourselves and disrespect the cake itself.  Each bite brought us closer to enlightenment, and reaching the crust was our awakening.  You should really sit down if you want to eat this cake.  We're not exaggerating.  Try this recipe and you'll see.  If you need a break from life, take in the intoxicating taste of this cake, and let all of your stress melt away.

Discussion
Figure 7. Sucrose
In our cake, the sugar that made contact with the pan caramelized.  What happens when sugar caramelizes? For a long time, it was thought that what happened as a result of heating sugar was that it would turn brown and become a liquid; that the chemical change of sugar molecules breaking apart and reforming into something different is initiated by the heat.  A simple chemical change, end of story.

Figure 8. Caramelized Sugar
However, Professor Shelly Schmidt's research group from the University of Illinois recently found out that it's a bit more complicated (McGee 2012).  Interestingly, they learned that sucrose doesn't just have one melting temperature like most solids.  Instead, two processes occur at two different temperatures.  At one temperature, the individual sucrose molecules break apart and become caramel, and at a higher temperature, the molecules break from each other, causing liquification (Schmidt 2012).  According to Professor Shelly Schmidt, the ranges at which these two processes occur are 290 ºF and 380 ºF, respectively.  Also, the slower the sugar is heated, the more of a chance it has to caramelize, and this reduces its melting point.

It is difficult to determine the exact chemical process that occurred in our oven.  First, the cake cooked at two temperatures, 350ºF and 400ºF, or just below and just above the melting point for sugar, respectively.  Second, ovens tend not to be entirely accurate in setting their temperatures, therefore the exact relationship between our cooking temperature and the chemical state of our cake can not be resolved precisely.  More cooking and testing must be done to fully understand the dynamics of caramelization.  However, we're not going to repeat this experiment a bunch of times because we want to make other foods.

References
1) McGee, H. September 2012. "Caramelization: New Science, New Possibilities." Curious Cook
2) Schmidt, S.J. Exploring the sucrose-water state diagram.  Manufacturing Confectioner, January 2012, 79-89.

Tuesday, December 25, 2012

Experiment 9: Deep Dish Pizza

Figure 1. Delicious Deep Dish Pizza
Introduction
One of the big Chicago traditions we cherish is eating deep dish pizza, especially from Lou Malnati's.  From non-Chicagoans (Read: New Yorkers), we've heard  deep dish pizza be compared to everything from a casserole to lasagna without the pasta.  However, as two people who grew up with the cheesy, saucy goodness of deep dish, we tell you now: pizza isn't a real meal unless you have to eat it with a fork and a knife.

For those of you who have never experienced the glory of deep dish pizza, we implore you to come to Chicago and try it yourself.  If you don't have the opportunity to do so, we hope we can provide you with a piece (or eight) of heaven on a plate with our recipe.

Our NFPA Ranking:
Figure 2. Our NFPA Ratings for deep dish pizza.

Difficulty: We ranked this recipe a 6 because it has multiple steps that a neurochef needs to coordinate in order to maximize efficiency.  The steps themselves aren't complicated, but you have to put them together properly.

Preparation Time: This recipe takes about two hours and fifteen minutes to complete.  We found it helpful to chop the tomatoes while the pizza dough was rising and to make the sauce when the dough was cooking.  Chopping four large tomatoes isn't instant, so allow for some time.

Course: Deep dish pizza is best eaten during lunch or dinner.  It's not sweet, so dessert is out of the question, and it's a bit too heavy for a midnight snack.

Materials
Figure 3. The dough after some thorough kneading.
Pizza Dough:
1) Warm Water - 1 cup
2) Active Dry Yeast - 1 package
3) Sugar - 1 teaspoon
4) Vegetable Oil - 1 tablespoon
5) Eggs - 1
6) Flour - 3 cups

Figure 4. Spices for the Pizza Sauce


Sauce:
1) Large, Fresh Tomatoes - 4
2) Olive Oil - 2 tablespoons
3) Garlic Power - 1 tablespoon
4) Italian Seasoning Blend - 2 teaspoons
5) Salt - .5 teaspoon
7) Ground Black Pepper - .25 teaspoon
6) Ground Red Pepper - .25 teaspoon

Cheese & Toppings:
1) Pizza Cheese (Mozzarella and Cheddar Mix) - 1 package
2) Other Toppings

Figure 5. Simmering the Sauce
Figure 6. Pizza Dough.  It should be thinner than this.
Procedure
Pizza Dough:
1) Pre-heat oven to 350 ºF.
2) Mix warm water, yeast, and sugar in a bowl.
3) Add the vegetable oil and the egg to the bowl.  Mix.
4) Add the flour one cup at a time.  Additional warm water can be added to help mix the flour into the dough.
5) Knead the dough (Fig. 3).
6) Put the dough in a covered bowl and let it sit for one hour.
7) Grease the pizza pan.
8) Place the dough in the pan by spreading it over the surface and then pinching it up the sides to form the crust (this also creates a bowl for your sauce and toppings).
9) Bake the dough at 350º F for 30 minutes.

Sauce:
1) In a skillet, simmer together the olive oil and garlic.
2) Add the herbs and spices (Fig. 4).
3) Turn up the heat and add the tomatoes and sugar.
4) Simmer until all of the flavors meld together to become one succulent sauce (Fig. 5).

Building the pizza:
A Chicago-style deep dish pizza is built in the opposite order from a traditional pizza.

1) Apply a healthy layer of cheese to the crust.
2) Put down a thick layer of your favorite toppings.
3) Finally, pour a layer of sauce on top (Fig. 7).
4) Bake the entire pizza for an additional 15 minutes at 350 ºF.
Figure 7. Pour the Sauce onto the Pizza Dough and Cheese.
Results
We did it!  It is in our hands...the knowledge that we lowly students have what it takes to recreate one of Chicago's defining culinary traditions.  You'll notice from the pictures (proof!) how real this is.

Actually, wait a moment.  To provide you with a painfully alluding reminder: pictures can deceive.  Although it looks more or less like a traditional Chicago-style deep dish pizza, it tasted quite different.  Don't get us wrong, it was still amazingly delicious, but it just wasn't what we expected, and probably wouldn't meet the standards of the Malnati family.

First, let's chat about the crust.  It rose as we expected during the allotted time.  However, baking the crust induced a tad bit more growth.  More specifically, the crust puffed up about an inch.  Instead of being a mere centimeter in thickness which would yield an ideal surface area to volume ratio, we ended up consistency similar to a soft pretzel.  In fact, the dough tasted like a soft pretzel.  While this was not what we expected, it was still quite flavorful.  We were left wondering how Lou Malnati's manages to get such a perfectly shaped crust every time.  Sure, they're experts, but it almost seems like they must have a mold that they use to hold the crust in place as it cooks.

In order to compensate for this unexpected turn of events, we skimped a little on the cheese.  In hind site, the proper way to compensate probably would have been to add more cheese.  Normally, the crust to cheese thickness ratio is roughly 0.5 to 1 or 1 to 1, but for our pizza, the ratio was more like 9:1.  Regardless, we still got goopy, picturesque cheese, just not as much.

Next, the sauce.  It turned out more like bruchetta-esque tomato sauce than pizza sauce.  Chunky, peppery, and savory.  Yum.  However, for the sake of education, we should tell you that we did this all wrong.  The best deep dish sauces are prepared raw and aren't cooked until put onto the pizza.  We broke the rules, but don't blame us, we were just following directions.

Figure 8.  Our final product, with a dash of cheese on top for effect.
Discussion
We want to take this opportunity to talk to you about cheese, that fatty, cholesterol-filled food that contributes to so many of our favorite foods, especially deep dish pizza.  Cheese is an intriguing food, as after it was invented by accident in ancient times, it has worked its way into different cuisines all over Europe and the Americas in different forms.  To make foods like pizza, cheese has to be melted.  How does that happen?  Let's start with how cheese is made.

We all know that cheese comes from milk.  Milk is primarily made up of water, protein, fat, and sugar (Martinez 2012b).  In ancient Mesopotamia, milk was carried in pouches made from animal stomachs (Martinez 2012a).  To the surprise of many, after some time, solid globs would start to separate from the liquid in the milk.  These globs, or curds, were made of protein and fat, while water and sugar formed the whey.  It was discovered that the curds could be eaten, and thus cheese was born.

How did the curds form in the first place?  It turned out that the animal stomachs that were used as pouches contained rennet, a type of enzyme that replaces the water that is bonded to milk proteins with fat (Martinez 2012b).  Because of the presence of rennet, after some time incubating in the dry heat, the protein and fat bound together and coagulated.

When you heat cheese up, the fat and protein in the cheese separate (Martinez 2012c).  This is why cheese "sweats" oil and becomes slick when it is heated up.  Unfortunately, cheese loses its flavor when the protein and fat separate.  This is not a problem in pizza (or your grilled cheese, for that matter), because the starches in the dough will help hold the two molecules together.  Grating your cheese helps retain the flavor, as well as including a small amount of liquor.

Future Directions
Coming soon: Fried Rice!

References
1) Baker, S. (Dough)
2) Dryden, S. 2012. "Recipe for Lou Malnati's-Style Deep Dish Pizza." Roaming Indigo. (Sauce)
3) Martinez L. 2012. Cheese in Ancient Times. Netplaces.
4) Martinez L. 2012. Curds, Whey, and Rennet. Netplaces.
5) Martinez L. 2012. How Cheese Melts. Netplaces.

Figure 9. Getting hungry yet?

Tuesday, December 18, 2012

Experiment 8: Potato Latkes

Figure 1. Perfectly cooked latkes: burnt on the outside,
warm on the inside.
The Great Potato Massacre!

Introduction
What's the best way to celebrate the end of finals?  A latke party with your neurobuddies, of course!  Potato latkes are a traditional Jewish food that is eaten during the festival of Hanukkah.  However, just because Hanukkah is over, that doesn't mean that you have to wait another year to cook these.  In addition to Ashkenazi Jewish cuisine, latkes can be found in established cuisines all over eastern Europe.  Typically, latkes are primarily composed of potatoes and onions, but for our neurofiesta, we welcomed several new variations on the dish from fellow neurochefs.  Aside from traditional latkes, the stove saw the frying of three other varieties: Purple potato and celery root latkes, sweet potato latkes, and parsnip latkes. All of these varieties involved the same general procedure, just with different materials.  Here, we will focus on the standard latke recipe.


Our NFPA Ratings (Fig. 2):
Figure 2. Our NFPA Ratings for potato latkes.

Prep Time: This varies depending on the amount you are making, because shredding potatoes and onions takes time.  On the short end, preparing and frying will take 30 minutes all together, but with the amount we made, it took about an hour.

Difficulty: Making latkes is a lot like making dough, in that it it involves a few, common ingredients to put it all together.  Having said that, shredding potatoes can be a pain in the butt, but that is perhaps more of a complaint than a criterion for assessing the difficulty of preparing latkes.  Just be patient; only flip them when they are ready.

Course: Depending on the cuisine, latkes can either accompany a meal as a delicious side, or they can comprise the main course.  It all depends on your eating habits and they way you cook your latkes.


Figure 3. Step One: shred the potatoes
Materials
1) Yellow potatoes* - 4 lbs.
2) Eggs - 4 (1 egg per lb. of potatoes)
3) Chopped or shredded white or yellow onions** - 1 cup
4) Flour - 1 cup
5) Salt - 2 tsp
5) Olive oil - a lot

*Can be replaced with sweet potatoes
**Can be replaced with celery root

Procedure
1) Shred the potatoes and onions in a food processor or salad shooter, and place the shredded pieces in a bowl of cold water (Figure 3).
Figure 4. Strain and dry.
2) Drain all the water out of the potatoes (Figure 4).  Dry them as much as you can, then return them to a dry bowl.
3) Add the onions, eggs, and flour.  Mix!
4) Put a non-stick frying pan on medium to medium-high heat, and coat the surface with olive oil.
5) Scoop spoonfuls of the potato mix into the frying pan and flatten them into 3-inch circles while making sure they still sick together. Thinner latkes fry faster and are tastier (Figure 5).
6) When the bottom edges look burnt, flip the latke to brown or burn the other side.  When it's done, remove it from the frying pan.  Best served hot....straight from the frying pan.

Top with apple sauce, sour cream, or sugar for additional flavor.


Figure 5. Clump together and flatten for best results.
Figure 6. Top left: Sweet potato latkes starting to cook.
Top right: traditional latkes finishing up.


Results
When you are cooking latkes, the key is to make the oil hot enough.  The trick is to burn the outermost layer of the latke for texture, while leaving the middle only moderately cooked, in order to preserve the taste of the potato.  Fortunately, cooking dozens of latkes gave us the opportunity to learn this over time.  At first, we put the stove on medium heat, and not only did our latkes take a long time to cook, but the potatoes had a terrible time browning.  Our undercooked latkes fell apart and gave way to hash browns (Figure 8).


Figure 7.  Pretty Latkes!
After we turned up the heat to medium-high, everything really started cooking.  The bottoms burned, which made flipping much easier, made for much prettier latkes, and gave them a good crunch (Figure 7).  However, at this level of heat, our oil started to boil.  As a result, we went through a bit more oil than we had first anticipated (Goodbye, barely used bottle).

It was all worth it.  Why?

THEY WERE DELICIOUS!  They were full of that oily, onion-y flavor of our childhoods.  Straight from the pan, these golden beds of flavor lit up our taste buds and flooded our brains' reward systems with a deluge of dopamine.  Although it sounds counter-intuitive, burning the faces of the latkes brought forth a new dimension of texture that rounded out the experience.  Although we started with our own recipe, we re-discovered how to make the kinds of latkes that would have lived up to the expectations of our ancestors.
How many did we make?

A lot.  Dozens.  We lost count because they were so delicious that everyone, human (n=16) and non-human (n=1) ate them as soon as they left the frying pan.  The leftover scraps from the pan, if they were not too burnt, were just as delicious, and were eaten just as quickly.  To be fair, we doubled the recipe to feed 16 hungry mouths.  One neurobuddy hung around the kitchen just collect the scraps from the frying pan.  Others crowded around the entrance to the kitchen so they could be first to devour the newly fried latkes.

Figure 8.  After a few rounds of cooking, a pile of hash browns started to
accumulate in the pan.
Discussion
We made this recipe up based on a review of a dozen or so other recipes.  While risky, this approach gave us the freedom to apply a fair amount of critical, scientific discussion to our choice of ingredients and cooking methods.

Science Part I: Food Chemistry
A few of our fellow neurochefs recommended that we submerge the potatoes in water after chopping them up.  Not surprisingly, we were curious about the effects of this submersion on the potatoes.  After a bit of research (mostly internet surfing), we learned that soaking chopped potatoes in cold water prevents discoloration of the potato pieces.  The cells that make up a potato contain an enzyme (protein that catalyzes reactions) called polyphenyl oxidase (Figure 9).  When oxygen contacts this enzyme in an oxidation reaction, potatoes turn brown (Helmenstine 2012).

Figure 9. Oxidation and Discoloration (Rotter 2011)
One way to prevent this oxidation reaction, and thus prevent the chopped potatoes from discoloring, is to submerge them in cold water (Helmenstine 2012).  This prevents the polyphenyl oxidase from coming into contact with oxygen.  Another way to prevent discoloration is to lower the pH of the potato's surface by adding lemon juice and creating an acidic environment in which the oxidation will either happen more slowly or not happen at all.

Science Part II: Neuroscience!
Figure 10. The Olfactory System
(MedicaLook: Your Medical World 2012)
Latkes have a certain smell, the smell of onion mix with that of fried foods.  It's the kind of smell that hangs around the house for a week.  So what's up with smells and science?  For starters, smell is the sense that is most closely tied to memory.  The senses of taste, vision, hearing, and touch all take a wayward route the sensory cortex in the brain, but the sense of smell heads straight there from your nose.  The area of the brain that is responsible for accepting smell signals is called the olfactory bulb (OB; Figure 10).  The OB sends this information straight to the memory center and reward center of the brain, thereby allowing people to make very strong associations between latkes, through their strong scent, and the people and places that were around when they were made.  This type of memory is called associative memory, because it's a learned association between two different stimuli, i.e. the smell of latkes and the environment in which you ate them.

For us, that means the smell of latkes instantly triggers memories of the people we ate them with as children.  Everyone has those foods, foods that their parents or grandparents made when they were kids, comfort food, the kind that returns feelings of warmth and pleasure.  It's all because of associative memory.  It could be the sight of cookies, the sound of boiling tea, or the texture of a braised beef on your tongue.  This phenomenon applies to all of the senses, but the sense of smell confers the strongest associations.

Future Directions
Coming soon: Deep dish pizza!

Acknowledgements
We would like to thank Kyler and Adam for coming up with the idea for holding a neurolatke party.  We would like to thank Jeff, Joe, and Carla for letting us borrow their food processors, Kyler and Cummings for cooking the purple potato and celery root latkes and recommending the use of yellow potatoes, and Tahra (Pi(e) Princess!) for cooking the parsnip and sweet potato latkes.  An additional thanks goes to Kyler for coming up for inadvertently coming up with the subtitle for our article.  We would also like to thank Alex for his very expressive positive feedback, Huey for licking the crumbs off the floor, and everyone else for attending the 2012 Neurolatke Conference!  This project was funded (very indirectly) by the Biological Sciences Division at The University of Chicago. 
 
Supplementary Materials  
Figure 1. Sliced purple potatoes, ready for shredding.
Figure 2. Sweet potato-apple mix.
References
1) Helmenstine, A.M. 2012. "Why do Cut Apples, Pears, Bananas, and Potatoes Turn Brown?" About.com Chemistry Edition.
2) 2012. "Olfactory Sense Anatomy." MedicaLook: Your Medical World.
3) Rotter, B. 2011. "Sulphur Dioxide." Improved Winemaking.

Tuesday, December 11, 2012

Lecture 3: Demystifying Your Ingredients - Sulfites


Part 2: Sulfites

Besides fats, ingredient lists contain many other names that you may recognize but not necessary understand.  Many times, these ingredients are preservatives, which are added to increase the shelf-life of your foods.

Today, we will talk about sulfites, a set of closely related chemical preservatives.  This preservative is one that you may consume often.

That is, if you're over 21.

Sulfites

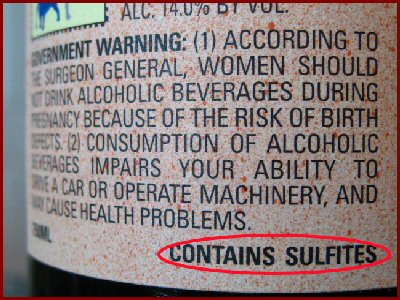
Figure 1.  A common warning on most wine bottles.
So...you're out shopping, and you decide to pickup a bottle of wine for a super-classy, not-student-styled, dinner party.  You stroll over to the wine section and see "contains sulfites" on nearly all the bottles.  It looks like a warning and it sounds bad, but is it?  What is a sulfite anyways?
 
"Contains sulfites" is a catch-all phrase for something that contains sulfur.  Sulfur is a natural byproduct of fermentation, so it's hard to avoid.  In the case of wine, sulfur is usually added in the form of SO2, the preservative known as sulfur dioxide.  Adding this preservative maintains the wine's fresh flavor so that the wine can travel from its winery all the way to your dinner table and taste as intended.  Grapes contain small amounts of sugar, which bacteria like to feast on as the grape breaks down.  Adding a little SO2 makes it very hard for bacteria to survive, and it therefore stops the breakdown.  If the bacterial fermentation process didn't stop, your grapes would turn into vinegar (Spencer 2010).

In general, unless you're allergic to sulfites, the amount of sulfur that's in your food and wine isn't going to hurt you.  You can buy sulfur-free wine, but unless you have a real allergy, that's not necessary.  According to Apartment Therapy, dried fruit contains more sulfites than wine, and red wind has a lower sulfite concentration than white wine and dessert wine (Gorman 2009).  They also mention that any wine with at least 10 parts per million (ppm) of sulfites must be labeled as such.  In other words, sulfites are an important part of keeping your wine fresh, but it's not like you're drinking a glass of sulfur.

Figure 3. Wine in San Gimignano
(Simmons 2012)
In the industrial sense, SO2 could cause some problems. Inhaling SO2 in its gaseous state could cause some lung irritation.  Coming into contact with liquid SO2, which is very cold, would definitely cause some skin problems, perhaps because of the temperature (CCOHS 1997).  Still, both of those events are pretty unlikely, so there's not much need to worry.
Figure 2. Sulfur Dioxide.
If you read our post about fats carefully, you should have noticed how we described carbon as only capable of forming four single bonds.  If you haven't taken organic chemistry, then the sulfur atom (S) in this SO2 diagram might look a little odd to you.  Sulfur is capable of having an expanded octet, which just means it can carry some extra electrons (the dots), which allows them to make more bonds.  So here, sulfur is seen with four bonds (two double bonds) to the oxygen atoms (O) and an additional two, unbonded electrons.

Now that you're had your tidbit of organic chemistry for the day, we'll give you a few more sulfur fun facts:
1) It's spelled "sulphur" in British English, which is simply called "English" if you're from the UK.
2) Sulphur is what makes well water smell like rotten eggs.  Gross!
3) Sulphur is a natural part of life.  It forms disulfide bridges between cysteines, one of our semi-essential amino acids.  Disulfide bridges are a kind of very strong atomic bond, and they are important for holding proteins together.

References
1) Gorman, M.  Nov. 2009.  "Sulfites in Wine: The Myths, the Facts, and the Truth."  Apartment Therapy: thekitchn.
2) Dec. 1997.  "Health Effects of Sulfur Dioxide."  Canadian Centre for Occupational Health and Safety (CCOHS).
3) Spencer, B. 2010. Sulfur in Wine, Demystified. Into Wine.

Tuesday, December 4, 2012

Lecture 2: Demystifying Your Ingredients - Fats

Part 1: Fat
These days, you nearly always have two options when you buy a food item: Original and fat free.  It has become trendy to select fat-free options when possible since they're socially considered healthier.  Interestingly, most people just sort of accept this without thinking about it.  Do you really know what fat is?  Do you think about what terms like fat-free, low-fat, trans-fat, or saturated fat actually mean when you buy those foods?

Figure 1. Fat Free Foods
All of those subtle variations make a big difference in how your foods look and in how your body handles them.  To explain it all, we're going to have to dig a little bit into organic chemistry.  But hopefully, after this, you'll have a better understanding of what you're really eating.

The Organic Chemistry of Carbon

First, we have to provide you with a little background on carbon for the rest to make sense.  Brace yourself...

Figure 2. a) Methane, b) Formaldehyde, c) Carbon Dioxide, 
d) Acetylene
Carbon atoms must be attached to exactly four other things to be happy and stable.  They can satisfy this requirement in different ways.  Overall, the number of bonds it makes with other atoms must equal four...and things get complicated because it can make single, double, or triple bonds.  For instance, one carbon atom can single-bond to four different hydrogen atoms to make methane (Fig. 2a), it can single-bond to two hydrogen atoms and double-bond to a oxygen atom to make formaldehyde (Fig. 2b), it can double-bond with two oxygen atoms to make carbon dioxide (Fig. 2c), or it can triple bond with another carbon and single bond with one hydrogen to make acetylene (Fig. 2d).  It can also forgo a bond for a pair of electrons, called a "lone pair" to keep for itself (replace the H's in Fig. 2d with two lone pairs and you've got carbon monoxide.)  These are just some examples of what carbon can do.  Carbon's versatility makes it the basis of all life.

Fatty Acids and Saturation of Carbons

Figure 3. a) Saturated Fatty Acid, b) Monounsaturated Fatty Acid
What does this have to do with fat?  Well, fat is primarily made up of chains of carbon that have hydrogen atoms filling up the carbons' available spaces for bonding.  Hydrogen is capable of making only one bond, which is why you see it single-bonding with carbon all over the place.  If all of the carbons are bound together with single bonds, its called a saturated fat, because the chain is as full of hydrogen atoms as it can get (Figure 3a).  If two of the carbon atoms are double bonded together, there suddenly isn't enough room for as many hydrogens because carbon will not make more than four bonds.  These fats are called unsaturated fats, because some hydrogens were kicked out (Figure 3b).  You can probably guess what polyunsaturated fats are (Hint: poly = "many" in Greek).

Two commonly used cooking materials are made of fat: Oil and butter.  However, you may have noticed that oil is a liquid and butter is a solid.  "But they're made of the same thing!" you say.  How can that be?  Butter is made of saturated fats, the ones with only single bonds.  These fatty acids are straight as an arrow, and therefore can get really close together to form a solid.  Oils, on the other hand, are made of unsaturated fats, the ones with the occasional double bond.  Double bonds, in certain cases (see below), form a "kink" in the chain, in that they made the chain bend.  These bent chains can't get as close to each other, therefore they don't stick together as well, and this results in liquid.

Cis vs. Trans Fats

You've probably heard of trans-fats.  Well, that name comes from some organic chemistry nomenclature.  Cis and trans are the names of the two ways hydrogen atoms arrange themselves around double-bonded carbons.  To explain why hydrogen bonds arrange themselves the way they do gets a little complicated, so we won't get into that.  Let's just say that due to some natural forces, trans bonds maintain that straight orientation for fatty acids, while cis bonds cause a kink to form (Fig. 4).  Therefore, like explained previously, trans-fats can pack closer together than cis-fats.  This means they can form plaques in your arteries, which is BAD FOR YOU.  Trans-fats also increase levels of LDL (bad cholesterol).  Therefore, you should avoid trans-fats!


Figure 4.  Cis vs. trans fat.  Notice the kink in the cis fat.

References
1) Belitz HD, Grosch W, and Schieberle. 2004. Food chemistry. Ed. 3, Springer, pp. 318-23.
2) Gardiner A, Wilson S. 2012. "Ask the Inquisitive Cooks." The Accidental Cook: Science of Cooking