Tuesday, October 30, 2012

Experiment 3: Roasted Rosemary-Onion Potatoes

Figure 1.  It just takes time and thyme.  And rosemary.

Introduction
To be honest, we only made these potatoes because we thought we needed a side dish with the Mexican-Style Chicken.  There was nothing particularly alluring about this recipe.  The finished product was tasty, but doesn't hold a candle in comparison to our delicious Pumpkin Cinnamon Rolls.  Really, after a dessert like that, who even needs to eat anything else?  We do.  Maybe we just needed more starch.  

One day, we will make a dish with a better story, one of those "reminds me of what my grandmother used to make" sort of fuzzy anecdotes.  Until then, please enjoy what we have to offer - a simple, restaurant-quality side to any delicious meat or vegetable you want for dinner.
Figure 2. Our NFPA Ratings for roasted rosemary-onion potatoes.

Materials

Figure 3.  Does that look like 1 inch to you?
1) Potatoes - 4 medium (1.33 lbs)
2) Onion, 1 small, finely chopped (.25 cup)
3) Olive or Vegetable Oil - 2 tablespoons
4) Rosemary - 2 tablespoons chopped fresh or 2 teaspoons dried
5) Thyme - 1 teaspoon chopped fresh or .25 teaspoon dried
6) Salt - .25 teaspoon
7) Pepper - .125 (1/8) teaspoon

Procedure
1) Heat your oven to 450 degrees Fahrenheit.  Grease a 15.5 x 10.5 x 1 inch jelly roll pan.  Cut potatoes into 1-inch chunks.
 2) Mix everything else in a large bowl, then add your potatoes and toss them to coat them.  After tossing, spread your potatoes in a single layer in your pan.
3) Bake uncovered for 20 to 25 minutes, turning occasionally, until potatoes are light brown and tender when pierced.

Explanation of our ranking (Fig. 2):

Prep time
The potatoes will sit in the oven for 25 ish minutes, so add the time you think it will take to mix everything together and spread.  Depending on how meticulous you are about measuring your spices and spreading your potatoes, that can take anywhere from 5-10 minutes.  It took us 15 minutes.

Difficulty
These potatoes were a cinch.  One bowl, one pan, one oven setting.  Can't get better than that.


Course
This is definitely a dinner go-with.  When they are fresh, that is.  They work as a lunchtime leftover side dish as well.

Results 
Figure 4. The final product.  Simon and Garfunkel would be proud.
Not only did these come out looking amazing (Fig. 4), but they were quite flavorful as well.  We could taste all of the spices, as they all combined to generate a multifaceted array of flavors.  Admittedly, the rosemary was rather pungent.  This was only because some potato pieces carried a higher concentration of rosemary than others.  Mix well, and you shouldn't have this problem.

The potatoes also came out slightly undercooked.  They are still delicious that way, but if you prefer softer potatoes, we recommend leaving them in the oven for 5-10 more minutes.

Overall, these spuds provided a wholesome addition to the flavor palette on our plates.  The strong flavor of the potatoes rounded out the relatively weak flavor of our chicken.  This combination made for a great pre-PCR snack...otherwise known as "dinner."

Discussion
We've already provided you with a general review of starches (See Experiment 1, Discussion).  Rather than continue to rave over starch, it's important to talk about more practical things with this recipe.  For instance, the seasoning, specifically the rosemary, gets stuck in your teeth.  This is annoying and makes this a risky dish unless you're eating alone or routinely carry dental floss in your pocket.

How do you choose between fresh or dried herbs?  Dried herbs are more convenient, as they come prepackaged in airtight containers.  Dried herbs also have a more concentrated flavor, which is why you can usually substitute 1 teaspoon of dried herb for every tablespoon of fresh herb (Television Food Network, 2012).  However, dried herbs go stale quickly if they are not contained well.  Fresh herbs have a more pure flavor, as well.  If you are using dried herbs, take a quick sniff first to gauge their potency.  Generally speaking, the longer they've been sitting in your spice rack, the more you'll have to use to achieve the same concentration of flavor.

Herbs lose their potency over time because the flavorants in herbs are proteins, and proteins fall apart when thy are exposed to light, heat, moisture, or anything else that disturbs the natural order of things.  The same concept applies to a lot of pharmaceuticals too, for that matter.  That's why you should keep your herbs in a cool, dry, dark place.  Airtight jars in a cabinet work.

Future Directions
Coming soon: Pumpkin Cake Pops

References
Crocker, Betty.  2012.  Roasted Rosemary-Onion Potatoes.  General Mills.
Television Food Network.  2012.  Using Fresh and Dried Herbs.

Tuesday, October 23, 2012

Experiment 2: Mexican-Style Chicken

Figure 1.  Check out those colors.  Can't beat that.
Introduction:

Okay, we have to come clean.  We didn't actually have pumpkin cinnamon rolls for dinner last week.  It should have been our main course, though, given that we spent most of our nine-hour cooking marathon bathed in a deluge of sugar and butter.

The truth is, we made Mexican-Style Chicken (Figure 1).  I'm sorry we can't be any more specific in the title, but we have to work with what we were given.

Figure 2. Our NFPA Ratings for Mexican-Style Chicken
Materials:
1) Chicken pieces - 2.5-3.5 lbs (cut from boneless chicken breast)
Figure 3.  One onion CHOPPED.
2) Butter - 1 tablespoon
3) Olive Oil - 1 tablespoon
4) Chopped onion - 0.5 cup
5) Clove of Garlic, 1 medium
6) Tomato sauce - 8 oz (1 can)
7) Chicken broth - 0.75 cup
8) Vinegar 1 tablespoon
9)  Chili powder - 0.25 teaspoon
10) Salt - Dash*
11) Green olives - 0.5 sliced, stuffed
12) Golden raisins - 0.25 cup
13) Green bell pepper - 1 cut in strips.


Procedure:
Figure 4.  We used the heaviest skillet we could find (~10 lbs),
but then we realized we didn't have a cover for it.


1) Heat butter or oil in a heavy skillet (get your weights out) over medium heat.  Brown the chicken.
2) Add onion and garlic (Fig. 3).
3) Add tomato sauce, chicken broth, vinegar, chili powder, salt, olives, and raisins.  Cover and simmer for 30 minutes (Fig. 4).
4) Add green pepper, cover and cook for 10 more minutes.

This dish is best served with hot, cooked rice.
Serves 4-6 people with leftovers for four-legged friends.


Explanation of our ranking (Figure 2):

Prep time
Most of your time will be spent sitting and waiting for your chicken and vegetables to simmer.  And remember: watched chicken never simmers.

Difficulty
We are still getting a handle on our difficulty scale, so take "4" to mean that this recipe is not that hard at all.  It has many ingredients, but very few steps.  Just keep an eye on the chicken to make sure you don't overcook it, because then it will be really dry and gross.


Course
This dish is too elegant to be served anywhere but at the dinner table.

Results
Overall, the chicken was a welcome addition to our culinary repertoire.  However, the dish left us seeking a bit more flavor.  More specifically, we wanted a little more spiciness.  Additionally, we didn't have any garlic cloves, so we switched that out for a tablespoon of garlic powder, which probably wasn't the best idea.  As a fan of stir-fry, Ben knows what a good amount of garlic tastes like.  This chicken didn't have it.  Dana is a fan of garlic in pasta sauce and agrees that the chicken was...well, it wasn't pasta sauce.

Figure 5. The finished product.  Mmm...

We also stood our ground on our selection of garnishes.  We share the same view on olives (ick!), So we avoided those.  Same story with the raisins.  Perhaps those would have added some texture and flavor.  It's fortunate that we kept in the green peppers as those really added to the chicken.  The contrast between the sweet, crunchy pepper and the soft, savory chicken made for several delectable, though not spicy, bites.

Remember how we said that this dish is best served with rice?  Well, we forgot about that.  But we thought of a better idea, so it's ok.  Stay tuned for Experiment 3, where we will explain our fabulous idea in more detail.

Discussion
This meal was full of two things we love: calories and protein.  Here we will discuss these two concepts in greater detail:

The energy we get from food is measured in Calories (note the capital 'C'), which are equivalent to kilocalories (1000 calories - small 'c').  One calorie (small 'c') is the amount of energy it takes (4.2 joules) to raise the temperature of one gram of water by one degree Celsius (1.8 degrees Fahrenheit) at standard atmospheric pressure.  One chicken breast has 30 grams of protein.  Proteins, like most carbs, provide four Calories (big 'C') per gram (Merill and Watt 1973).  Hence, the protein in one chicken breast will yield 510 kilojoules energy, which is enough energy to keep me writing for about 20 more minutes.  Fat yields the most amount of energy per gram, but it also takes a lot longer to digest.  As mentioned in Experiment 1 (See Discussion), carbs are digested the fastest.  Proteins offer a happy medium, where they provide a moderate amount of energy in not too much time.

Figure 6. Mexican-Style Chicken with 
Roasted Rosemary-Garlic Potatoes
You've probably heard of the four basic tastes: sweet, salty, sour, and bitter.  However, there is a fifth: umami.  No, this is not a misspelled abbreviation for the University of Miami.  Umami (literally means "pleasant taste" in Japanese) is the savory flavor of meat.  Your taste buds have receptors that are sensitive to glutamate, which is a component of most proteins and signals the umami taste.  In fact, monosodium glutamate (MSG), is added to foods to enhance the savoriness of meat and vegetables.  Umami gets to your brain in a very similar way as sweet taste (See Experiment 1), therefore a little goes a long way.

In addition to meat, umami is also present in vegetables such as ripe tomatoes and mushrooms.  The umami flavor itself is not palatable without an accompanying savory scent, but it's especially tasty when mixed with salty taste.  Then again, salt makes everything taste better, right?

Future Directions:
As you see in the pictures, we made some roasted rosemary-onion potatoes to go along with our chicken (Fig. 6).  See Experiment 3 for the details (link coming soon!).

References:
Merill, AL and Watt, BK. 1974. "Energy Value of Foods." Agriculture Handbook.  Washington, D.C.: United States Department of Agriculture. Energy Value of Foods

Rattray, D. 2012. "Mexican Chicken Recipe." About.com Southern Food.


Tuesday, October 16, 2012

Experiment 1: Pumpkin Cinnamon Rolls


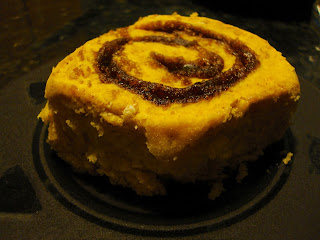
Figure 1. Delicious Just Became a Noun
Introduction
Recipe number one!  Are you excited?  We are!  We were planning to start off with something healthier for a main course.  But there's nothing wrong with having dessert for your main course.
Pumpkin Cinnamon Rolls (PCR) sounded so much more delicious than anything else, that we had to start with them.

Historical Note: Cinnamon rolls, or kanelbullens, are thought to originate from Sweden, where October 4th is celebrated as Cinnamon Roll Day (kanelbullens dag) (Hembakingsrådet 2012).

Figure 2. Our NFPA - PCR Rank
Explanation of our ranking:

Prep Time: If you only made PCRs, this is how long it would take.  The time increases if you refrigerate the dough...so we didn't.

Difficulty:  This was tough to determine since it's our first recipe and we had no benchmarks on the difficulty scale for comparison.  So we picked 7.  This recipe has a ton of ingredients, and a ton of steps.  It's complicated, but the first bite of warm cinnamon, sugary glaze, and pumpkin dough makes it all worth it.

Course: Is there a wrong time of day to eat something so delicious?  Nope.


Materials
Dough
Figure 3. Dough...Sort of looks like a brain!
1) Unsalted Butter - 6 tablespoons
2) Whole Milk - 0.5 cup
3) Active Dry Yeast - 2.25 teaspoons
4) Flour - 3.5 cups
5) Light or Dark Brown Sugar - 0.25 cups
6) Granulated Sugar - 0.25 cups
7) Table Salt - 1 teaspoon...NaCl :)
8) Ground Cinnamon - 0.5 teaspoons
9) Freshly Grated Nutmeg - 0.25 teaspoons
10) Ground Cardamom - 0.125 (1/8) teaspoons
11) Ground Ginger - 0.25 teaspoons
12) Pumpkin Purée, canned or homemade
13) Egg - 1 large
14) Oil for coating rising bowl

Filling
1) Light or Dark Brown Sugar - 0.75 cups, packed
2) Granulated Sugar - 0.25 cups
3) Sodium Chloride - 0.125 teaspoons
4) Ground Cinnamon - 2 teaspoons

Glaze
1) Softened Cream Cheese - 4 oz.
2) Milk - 2 tablespoons
3) Powdered Sugar - 2 cups
4) Vanilla Extract - A few drops

Procedure
Making the Dough
1) Melt butter in a saucepan.  Let it burn a bit for extra flavor (Perelman 2012).  Remove from heat.
2) Combine warmed milk (not over 116 ˚F) with yeast in a bowl.  Look for foam after 5-7 minutes.
3) In a different bowl, use an electric mixer to combine flour, granulated sugar, brown sugar, salt, and spices.  Add 0.25 cups of the melted butter and stir.  Add milk-yeast mixture, pumpkin purée, and egg, then mix.
4) Scrape mixture into a large, oiled bowl and cover with plastic wrap.  Set aside for 1 hour, it should double.

Assembling the PCRs
1) Scoop dough onto a well-floured surface.
Figure 4. Measuring the Dough Dimensions
2) Use a rolling pin to roll the dough into a 11x16x0.5 inch rectangular prism.
3) Brush the rest of the melted butter over the dough.
4) In a bowl, stir together all of the filling ingredients.  Sprinkle the mixture evenly over the dough.
5) Starting on the longer side, carefully roll the dough into a tight spiral.
6) Cut the cinnamon rolls in slices (1-inch sections) using a sharp serrated knife. Apply almost no force to the to the knife while cutting.  Cut 16-18 slices.
7) Put cut slices into baking pans arranged laterally.  Cover and let them rise for 45 minutes.

Figure 5. Our Perfectly Sliced PCRs - Pre-Baking
Baking
1) Pre-heat oven to 350 ˚F
2) Put the PCRs in the oven for 25 minutes.

Making the Glaze
1) Combine whipped cream cheese, milk, powdered sugar, and vanilla in a bowl and mix.
2) Spread the glaze on the cooked PCRs after they have cooled a bit.

Figure 6. Timeline
Results
Objectively speaking, we are happy to report that all taste testers (n=2) ranked the PCRs as unrealistically delicious on a scale from good to unrealistically delicious.  A third taste tester spent several hours trying enthusiastically, but unsuccessfully, to get a bite.

Let's start with that gigantic list of ingredients.  All ingredients were purchased in October 2012 at Treasure Island.  We used salted butter instead of unsalted, skim milk instead of whole, the first yeast we found instead of active dry yeast, and no cardamom.  We decided on dark brown sugar because a woman shopping in Treasure Island told us the flavor of dark brown sugar is better than the flavor of light brown sugar.  We used canned pumpkin purée instead of homemade.  Unanimously, we decided that unless we got to grow the pumpkin, then there was really no need to make our own purée.  Though we have mad skills, we doubted that we would be able to grow a pumpkin within the frame of our timeline (Fig. 6).

Figure 7. Bad Yeast
Time to chat about making the dough!  First of all, we couldn't really tell if the yeast was foaming in the milk.  It didn't look like the PCRs ever rose either.  Maybe we got a packet of bad yeast (Fig. 7). Also, we mixed everything by hand since neither of us has an electric mixer.

Some notes about assembling the PCRs: We didn't have a rolling pin, so we were going to use a wine bottle.  Then we decided on a plastic cup because wine bottles with a two glasses-worth of red in them don't mix well with dishwashers.  We rolled the dough into almost the right size, limited by the size of our largest cutting board, but then rolled it in the wrong direction (lengthwise instead of width-wise.)  The effect of rolling in the wrong direction was that our rolls had fewer rings and were bigger.  Instead of 16-18 PCRs, we sliced 12. 

Figure 8. Rolled Dough and Filling
Discussion
Figure 9. Mmmm...Carbs!
To some of you, the title may read "CARBOHYDRATES!!!!"  We understand.  In this post-Atkinsian world in which we live, we have learned to avoid carbs like that almost-empty milk jug that's been sitting in the back of your fridge for a while.  However, to be fair, in moderation, carbohydrates are our most important (and most delicious) resource.  In fact, carbs are our primary source of energy.  Glucose is broken down in our mitochondria (the power plant of the cell) and converted into little energy stores called ATP, which go around and provide our cells with the energy they need to function.

In fact, the importance of carbohydrates is precisely why they taste so good.  Catch-22, right?  The sweet receptors in our taste buds are of a class of receptors that pass messages along an assembly line of molecules.  This system lets the initial sweet signal to amplify at each step.  Think of it as one person passing a message to three more people, and each of those people passing that message to three more people, and so on and so forth...but on a much grander scale (quantitatively speaking).  As a result, our brain knows right away what is going on and responds with, "I like this...I WANT MORE!!!"

In carboloaded foods like bread, pasta, etc., carbs come in the form of starches, which are big chains of glucose molecules. We don't perceive these complex carbs as sweet tasting because glucose doesn't register to our sweet taste receptors when it's locked up in this form.  Fortunately, there is an enzyme in our saliva called salivary amylase that starts breaking down starch into glucose before we swallow!

Health Note:  After munching on a few of these unrealistically delicious PCRs, we figured out that each roll had about 0.3 cups of sugar in it.  And a lot of butter.  It may be best to ignore those facts if you want to enjoy your food.

You'll notice our pictures don't include any rolls with frosting (the primary contributor to the sugar content).  We didn't want to cover up the pretty spirals!

*If you read our pilot study, you know how we feel about this vague unit of volume.

Future Directions
Coming next: Mexican-Style Chicken!

References
1) Hembakingsrådet. 2012. "Välkommen kanelbulleälskare!" Kanellbullens Day.

2) Perelman, D. 2012. "Pumpkin Cinnamon Rolls." smittenkitchen.com.

Sunday, October 14, 2012

Pilot Study: Caramel Hot Chocolate

Figure 1. Yum!

Before initiating the experimental process, we decided to take a step back and test our cooking intuition by piecing together some delicious hot chocolate using elements of current and past culinary projects.  Call it a pilot study, if you will.

One purpose of this study was to see what we could come up with on our own.  This is important because if we completely mess up a recipe, it's important to be able to figure out how to salvage it quickly.  Also, we couldn't pass up the hot chocolate packets once we saw them in Treasure Island.

Figure 2. Carmel Hot Chocolate
Yes, you read that right, we used the instant stuff.  But trust us, it looked really appealing: Chocolate Caramel Hot Cocoa Mix (Nestlé S.A.).  With some boiling water, a dash* of cinnamon, 14 marshmallows, and pair of matching red mugs, these seemingly innocuous packets of powder evoked a much appreciated feeling of solace among the baking chaos that was unfolding on the other counter (See Experiment 1).  With that came the confidence that we might pull through with our cooking marathon, after all (Details to follow).


*We attempted several times to define the standard volume of a "dash."  We didn't come to a consensus.  You're on your own with that one.

Monday, October 8, 2012

Lecture 1: Summary

This blog presents the journey of two University of Chicago neurobiology grad students who are learning to cook and who sometimes like tomatoes, but usually don't.  Join us as we branch out from pasta!

Not only are we synthesizing satiable cuisine, but we even stop by the lab once in a while...or a lot.   Therefore, be warned: Science is imminent.

We will approach the cooking process as a series of experiments.  We will hold to our standards as scientists and provide you with the entire procedure, from flour to fork, and all the honesty in the world if we screw up.

The National Fire Protection Association has provided the world with this handy-dandy Hazard Rating System (a.k.a. 704, a.k.a. "fire diamond"), which we have decided to borrow and adapt for our uses (Figure 1).  Normally, blue = health risk, red = flammability, and yellow = instability/reactivity, but we do not expect our dishes to catch fire, blow a gasket, or send you to the hospital.  That said, if you would like to recreate these results, we recommend making sure you have a smoke alarm and fire extinguisher on hand.

Here's how we'll rate our results:
Figure 1.  NFPA Fire Diamond (modified)

Prep time: Units in minutes.  That's assuming 6000 jiffies per minute.  (1 jiffy = .01 s)

Difficulty: Scale from 1 (easy as pie...although, is pie that easy?) to 10. (Gordon Ramsay on a bad day)

Course: "A horse is a horse, of course, of course, And no one can talk to a horse of course. That is, of course, unless the horse is the famous Mr. Ed."  (lunch, dessert, dinner, midnight snack, etc.)

Generally speaking, when you want to learn something, a good place to start is with a pile of textbooks.  Figuring that becoming neurochefs was no exception, we chose a selection to get us started (Figure 2).  We're going to be two smart cookies after reading these!

Figure 2: We'll be two smart cookies after reading these!